Tuesday, July 27

Ceramic Trivet Gift Idea

About two weeks ago, I posted a selection of coasters that I had made using 4" square tumbled marble tiles that can be purchased at your local home improvement store. Today, I am featuring a ceramic trivet idea. This project was made using 6" square white ceramic tiles that can also be found at your local home improvement store.


Wouldn't this be cute in a little girl's room as a message board?
Wouldn't this be cute in a little girl's room? Here is a closer look at the flowers and butterflies:


These tiles were stamped a little differently. I used my stamps and a special ceramic paint that I bought at my local craft store. It's quite simple, just apply the paint to your stamp and stamp onto the ceramic piece. Be cautious when stamping . . . the paint is thick and "wet" which makes it easy for your stamp to slip and slide on the smooth ceramic tile surface. Stamp slowly and with even pressure to ensure that you get a good impression without distorting the impression. Worst-case scenario . . . you wash off the tile and start again. Be sure, also, to IMMEDIATELY wash your stamps when you have finished stamping, as this paint will dry permanently on the rubber. Once stamped, the ceramic tile piece can then either be baked or set aside and left to dry and completely cure on its own. You can then place cork on the back of the ceramic tile or just add some "feet" that you can find at your local craft store (I would add a strong adhesive to the "feet"; I wouldn't trust the adhesive on them to be strong enough to withstand use or the texture of the back of the tile). These tiles don't have to be used merely as trivets--you can also use them as little message boards in your kitchen, like you see advertised in home decor catalogs, or, put a few tiles together and make a message board for your child's room. If using the tile as a message board, it can be written on with dry erase markers. You can also create a beautiful, one-of-a-kind serving tray--purchase a wood serving platter at your local craft store, put a few tiles together and you have a beautiful serving tray.

So, take another look at your stamps . . . make custom trivets or message boards or serving trays. Give them as a gift! Like the coasters, your friends will be amazed that you made these--and only you will know just how easy it was to do!! All stamps used for these trivets are from Stampin' Up! sets.

Lastly, a reminder that if you haven't participated in the QKR Stampede Frosty in July Blog Hop, there is still time. There is a wonderful prize being offered--a $25 gift certificate (with free shipping)--to be used at the QKR Stampede store. You have until the end of the day Wednesday, July 28, to complete the Hop; a winner will be randomly selected and announced Thursday, July 29. You can start the Hop here. And don't forget if you aren't a QKR Stampede fan/friend/"liker" on Facebook, be sure to go to Facebook and become a fan of QKR Stampede. During the month of August, every Monday, a fan/friend/"liker" will be randomly drawn and will win a free stamp of their choosing. And one last little item . . . if you already have some QKR Stampede stamps and would like an easy way to "earn" free QKR Stampede stamps, make card fronts using only QKR Stampede stamps** (you can use any type of paper, ink, embellishments, etc.) and mail your card fronts to Maribeth Douglas, QKR Stampede, 19522 High Park Road, Cedaredge, CO 81413. Now, through the end of August, for each card front you send, you can receive one free stamp. Be sure to include with your card fronts a list of the stamps you wish to receive in return. (**You cannot use any stamp images from any other stamp company when making these card fronts, as they will be used for a convention and images from other companies will infringe on copyright laws.)

Monday, July 26

It's QKR Monday . . .

Once again, it's QKR Monday! I hope you came by over the weekend to participate in the QKR Stampede Frosty in July Blog Hop. All of the projects created by the design team members were Christmas or winter themed and were absolutely spectacular!!! If you missed the Hop, there's still time to get in on it and be eligible for a prize--a $25 gift certificate (and free shipping)--to be used at the QKR Stampede store. If you're interested in participating in the Hop (and who wouldn't love a chance at some free stamps?), go here for the details. Be sure to read to the end of this post for two special QKR Stampede announcements!

In keeping with the Christmas Blog Hop theme, today's project uses the QKR Stampede The Reason (#8712) stamp with the Sweet Sunday Sketch Challenge 79 (SSSC79). As you can see with this project, this stamp image works very well on its own as a focal image, and is perfect, of course, for the sentiment on the inside of your hand-stamped Christmas cards.


QKR STAMPEDE SPECIAL ANNOUNCEMENTS:  Every Monday in August, QKR Stampede will have a random drawing from its list of Facebook friends/fans/"likers". The person whose name is drawn will win a free QKR Stampede stamp of their choice! If you're not already a friend/fan/"liker" of QKR Stampede on Facebook, go here today so that you have a chance to win a free stamp of your choosing. Good luck!!

Do you already own QKR Stampede stamps and have a wish list of other stamp images you would like to own? Interested in an easy way to earn some free stamps? QKR Stampede will be participating in its first convention, in Boise, Idaho, the weekend of September 24 and 25, and is in need of card fronts for its display boards. Using only your QKR Stampede stamps**, create a card front (or card fronts), and mail them to the attention of Maribeth Douglas at QKR Stampede, 19522 High Park Road, Cedaredge, CO 81413. In return, you will receive one (1) free stamp image per card front mailed. Now, isn't that an easy way to get some free rubber??? (**In the absence of a particular sentiment you may want to use on your card, you can either computer-generate or handwrite the sentiment; you CANNOT, however, use stamp images from other companies on these cards as they would not be QKR Stampede images and would expose the company to copyright issues. You can use any papers, inks, and embellishments of your choosing.) Thanks for stopping by and visiting today; your visits and comments are greatly appreciated! Have a terrific day!!!!

Thursday, July 22

Frosty in July . . .

It's here . . . the much anticipated QKR Stampede Christmas-themed Blog Hop. You should have arrived here from Holly's Blog; if you didn't, please go there now and enjoy the adorable project Holly has created for you, then be sure to come back here to continue the Hop. If you came here before visiting any other blogs, be sure to start at the beginning of the Hop so that you don't miss anything! I made a lot of projects for this Hop and just couldn't decide which to share, so I am sharing them all -- there are cards, gift tags, and a gift idea. So sit back, take your time scrolling through, and enjoy!

CARDS
When I first saw The Perfect Christmas Tree (#12708), it reminded me of the Charlie Brown Christmas Tree!! I LOVED it when I first saw it and knew I had to do something with it!
How CUTE is this Sledding Bear (#15906)? He's sledding down a snowy hillside--perhaps on his way to your house--with his decorated Christmas tree in hand!
When I saw this Christmas Lights Kitty (#23703), I just knew I had to get it and do something with it. I have two cats, and luckily, neither one has ever bothered my Christmas tree, the lights or decorations! I did have a cat, though, who liked to lie under my Christmas tree and paw at the ornaments; apparently, he liked the swinging motion.
Who doesn't LOVE snowmen . . . be it at Christmas or throughout the winter season. These darling snowmen have dropped by to do some Caroling (#13606) and spread some holiday cheer!

GIFT TAGS
The Perfect Christmas Tree (#12708) reminded me of the Charlie Brown Christmas Tree. I knew I had to get this stamp and be creative with it.
In the Manger (#16710) is just one example of the "not so quirky" stamp images that QKR Stampede has to offer. This image is well-suited for gift tags, cards, and even scrapbook page layouts (any children  or grandchildren participating in a Christmas play this year?).

Sledding Bear (#15906) is perfect for gift tags. Wouldn't he look adorable adorning a gift package?
GIFT IDEA
This set of coasters was created using the Birdhouse (#14514) stamp. There's just something about snowman images with birds and birdhouses--they're simply charming! If you follow my blog, you may recall that I recently posted a collection of coasters and directions on how I made them (you can find that post here). These coasters were made in the same manner and were colored using chalks and a blender pen. Here is a close-up of one of the coasters:
As with the previous QKR Stampede Blog Hops, there is a prize being offered--a $25 gift certificate to use at the QKR Stampede store--to those participants who not only stop at each Design Team Members' Blog, but also take the time to leave a comment. Once you have visited the last blog in the Hop schedule, go to the QKR Stampede Blog and leave a comment that you completed the Hop, as well as any general comments you might have to offer regarding the Hop. If you have met the criteria (visiting and commenting at each Design Team Member's Blog and at the QKR Stampede Blog), your name will be entered in a random drawing for the gift certificate. Want to increase your chances of winning? There are three ways you can increase your chances of winning: (1) become a follower of the QKR Stampede blog; (2) become a fan/friend on Facebook; and (3) make mention of this Blog Hop on your personal blog.

 I hope you enjoyed seeing these projects as much as I enjoyed making them! Your next stop on the Frosty in July Blog Hop is at JESSICA'S blog, where an adorable project awaits you. Thank you for participating in the Hop, make sure you leave your comments, and good luck!!!

Another Note Card Set

I enjoy making note card sets and giving them as gifts to friends and family. It's also fun to get notes from friends and family who have used one of the note cards I made. I'm often reminded of one of the designs I had done before I was keeping samples of my work! I am very fortunate to have a paper supply store in the area that sells good quality card stock and other card supplies (pre-folded cards, envelopes, etc.) very inexpensively. The note cards that I am featuring today were made with a card blank that has an embossed  center and is pre-scored so all I have to do is stamp. The card blank measures 4-7/8" X 7" and is scored at 3-1/2". When complete and folded, the card is the size that is often associated with Wedding Thank You cards.
For this notecard set, I used the Heart Deco peg stamp set by Rubber Stamp Tapestry. The sentiment is from the Sincere Salutations stamp set by Stampin' Up! You can whip out a set of these note cards in a mere matter of minutes--it's that easy!! Rubber Stamp Tapestry offers over 120 wonderful peg stamp sets in different themes. Since I started buying some of their peg stamp sets, the company has  branched out to offering individual peg stamps, fabric stamps, border stamps, and block stamps, as well. One of the great features of these peg stamps is their "placement line"--a line along a portion of the wood dowel that is an indicator, or guide, of the image's orientation; that makes my stamping so much easier!

Tomorrow is the QKR Stampede Frosty in July Blog Hop; and here is my final sneak peek of a project that I have in store for you:
I look forward to seeing you at the Hop and look forward to your comments and impressions of the Hop, as well. As always, thank you for stopping by and visiting. Have a terrific day!

Wednesday, July 21

Dry Embossing--The Old Fashioned Way

Remember the days of dry embossing before the Cuttlebug, Wizard, and Big Shot machines and embossing folders? Remember Fiskars Texture Plates and the little contraption you held in your hand and rubbed--aggressively and with a lot of pressure--over the texture plate to get an impression (and not the best of impressions at that)? I usually wound up with a bit of an impression and a very sore hand! Remember dry embossing with a brass stencil, embossing stylus(es), and a light box (and those who didn't have a light box would tape the stencil to a window)? Remember how amazed you were when you first saw dry embossing demonstrated either at a home stamping party or at your local stamp store? Dare I say "those were the days"?? Those "days" aren't that far behind us . . . it's amazing to consider how quickly product lines and ideas change--out with the old, in with the new. As you might have guessed by now, today's card was created using the old-fashioned dry embossing technique--a brass stencil, embossing stylus, and a light box.

The close-up photograph shows the detail of the embossing . . . flower petals, leaves, and the decorative "dots". The brass stencil is one that coordinates with the Bodacious Bouquet stamp set by Stampin' Up! I also use PergaSoft, a wax product originally designed for use with pergamano tools, to "condition" my embossing stylus. PergaSoft allows the embossing stylus to glide effortlessly over, and prevent tears in, the card stock. Some people will rub wax paper over the card stock before using the embossing stylus, but I have found that the PergaSoft works better. One of the advantages of using a brass stencil for dry embossing is you can pick and choose your image(s) and where you want them to appear on your card stock--something you cannot always--or easily--accomplish with an embossing folder. All in all, dry embossing is a little more time consuming than using an embossing folder and one of the machines, but there is also a different sense of achievement when you dry emboss the old-fashioned way!

Don't forget . . . only two days until the Frosty in July Christmas Blog Hop. Here is another sneak peek:
Thanks for stopping by for a visit today! Have a great day!!

Tuesday, July 20

Note Card Sets

Today I am sharing a set of note cards that were made based on dimensions shared at the Gina K Designs website for a Memory Keeper (you will find all the dimensions for this project at that site, as well). If you follow the link, you will see that the basic idea was also adapted for cards. The stamps used for this project were from the Sweet Dreams stamp set by Stampin' Up!
These note cards were fun and easy to make and when presented in the note card holder, are a terrific gift item. What I love about this project is you can design your cards to be fancy or simple . . . and either way, the recipient is going to love the set of note cards!! Thanks for taking the time to stop and visit today! Have a wonderful day!!

Monday, July 19

QKR Monday . . . Christmas Blog Hop

It's QKR Monday! Today's project uses the Special Delivery (#14010) stamp by QKR Stampede. This image has been on my wish list for quite some time, and I finally got it!! What cute baby shower cards, birth congratulatory cards, birth announcements, or scrap book pages can be made using this stamp!
I used a background paper that I have had for a while and which, unfortunately, has no manufacturer's identification. The image was stamped with my Ancient Page Coal Black dye ink and colored with my Prismacolor water color pencils and a blender pen. The baby feet brads are by Accent Depot and the "It's A Boy" charm is by Darice. To see another card project using this stamp, go to the QKR Stampede blog to this post.

Christmas Blog Hop:  Just a quick reminder to be sure to mark your calendars for the Frosty in July Christmas-themed Blog Hop this Friday, July 23. Here is a sneak peek that I featured a couple weeks ago, before the Hop was rescheduled:
 as well as a new sneak peek of another project for the Hop:
Be sure to join us for the Frosty in July Blog Hop this Friday, July 23, and be sure to tell all your stamping friends to do the same! The Design Team Members have some terrific projects prepared to share with you. Stop back throughout the week for other projects and Blog Hop  sneak peeks! Thanks for stopping by and visiting today! Have a great day!!

Saturday, July 17

Garden Silhouettes

Today's card is based on the Clean and Simple Stamping Fall-To Layout 99 (FTL 99) and uses the Garden Silhouettes and Small Script stamp sets by Stampin' Up! In keeping with the clean and simple theme, I decided on a basic black and white color scheme. To add a little interest to the focal image piece of card stock, I scored along all four sides. I added a sentiment in pink to give a little splash of color, but chose not to layer the sentiment so that it wouldn't take away from the main stamped image. I have had the ribbon for a while and have been waiting for the perfect opportunity to use it; I thought it complemented the stamp image very well.

Thanks, as always, for stopping by and visiting today! Have a great weekend!

Friday, July 16

Bracelets

Here's another project that is stamped, but is not a card . . . polymer clay bracelets. After the polymer clay has been conditioned (warmed and kneaded), it is then put through a pasta machine until it reaches the desired thickness (the pasta machine will be dedicated to polymer clay; do not use it for making pasta).
For this bracelet, black polymer clay was used. The clay was placed onto wax paper that was attached to a self-healing cutting mat and stamped into with a rubber mat for clay. After the clay was stamped, PearlEx powders were brushed onto the clay. The clay was then cut into 1/2" square tiles, placed onto pieces of mat board, then baked in a toaster oven at 275 degrees for approximately 30 minutes. (The toaster oven has been dedicated to crafting and is not used for any food preparation.) After the tiles have cooled, arrange as desired onto a bracelet blank and adhere with a strong adhesive (I use E6000, which can be found at hardware stores, home improvement stores, and local craft stores). After adhering to the bracelet blank, brush the tiles with a sealant, such as glossy accents, crystal lacquer, or Future Floor Wax.
For this bracelet, Premo Sculpey clay, in Pearl, was used and was stamped onto with StazOn Timber Brown ink. The stamp image is a floral image that, with treatment, got a bit distorted . . . I liked that look a lot. The individual 1/2" square tiles were edged with a Krylon Gold Leaf pen for a little added pizzaz.
This last bracelet also used Premo Sculpey clay, in Pearl, as the base. The clay was stamped into with a rubber mat for polymer clay and was brushed with PearlEx powders prior to baking.

Try this out some time . . . it's a lot of fun and you'll be amazed with the beautiful pieces of jewelry you can make. Change it up a bit by adding a watch face and turning it into a bracelet watch. Thanks for stopping by and paying a visit!! Have a great day!!!!

Thursday, July 15

Cherry Mojo

Today's card is for the Mojo Monday challenge (MOJO147) and uses the Tart & Tangy and Pocket Silhouettes stamp sets by Stampin' Up! I decided to use the cherry stamp in the set since I had some cherry-themed, double-sided background paper from Creative Imaginations.

I altered the sketch just a bit by centering a stamped square over the squares in the sketch. My background squares were cut at 1-1/2", the stamped cherries were cut out with a 1-3/8" square punch and layered onto a piece of red card stock. The half circles were cut with my Cuttlebug and Nestabilities circle dies. Thanks for stopping by today and visiting! Have a great day!!

Wednesday, July 14

Coasters

Not the amusement park coasters, but drink coasters for your beverages!! These coasters were made using 4" square tumbled marble tiles that are found at your local home improvement store. When I first started buying these tiles, they came in boxes of 50--now I can find them only in boxes of 9. The following stamp images are from Stampin' Up!, PSX, and Just For Fun.


When I first made the coasters, I tried a variety of coloring techniques and tested them at a dinner outing with friends. I knew there would be beverages, so I took a bunch of coasters to "test" at the restaurant and see the results of my efforts, and there were some coasters that just didn't stand up to the sweat from the drink glasses. As a result, whenever I make coasters, I stamp the image using StazOn ink, then color using chalks and a blender pen or markers (you can also color with any permanent markers). The coasters are then baked in a toaster oven that is dedicated for crafts -- find one inexpensively at garage sales, flea markets, or your local Goodwill or Salvation Army store. If you are coloring with permanent inks, you can skip the baking step (I still bake the coasters, just for good measure). After completely cooling (they will be HOT!), the coasters are sealed using a Krylon sealant spray (I tend to use the satin finish, but I have also used matte and glossy). After the sealant spray has completely dried, I cut cork sheets to 3-7/8" square and apply to the back of the coasters using basic white craft glue (Aleene's). Even with the Krylon finish, the coasters absorb the sweat from a chilled glass. I keep a coaster at my desk--home and office--and often rotate the coasters, depending on the season or my mood!

The sky's the limit, so to speak, with these coasters. You can color or choose not to color, depending on the look you want. Any image can be stamped onto the coasters, including bold images. You can stamp with a variety of stamps, creating a collaged image. Make a set of four and give them as a gift; the gift recipient will be AMAZED that you made these!! As always, thanks for stopping by and visiting today. Have a terrific day!!

Tuesday, July 13

Inspired . . .

My card today uses the CardPatterns Sketch 72. One of the papers I used for this card I used on yesterday's card . . . it was still sitting on my desk. The squares for this card were cut at 1-1/4", arranged and adhered onto a piece of 5-1/4" card stock, then mounted onto a 5-1/2" square card base. The sentiment is from the Define Your Life stamp set by Stampin' Up!

This card was very easy to put together. Look through your stash of patterned paper . . . you're bound to find a few that coordinate together and will make a terrific card! Thanks for taking the time to stop by and visit! Have a wonderful day!!

Monday, July 12

It's QKR Monday . . .

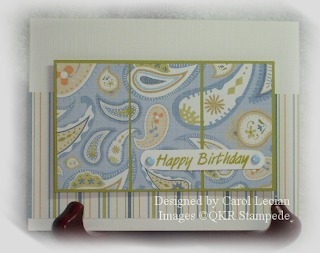
Today's card uses the Clean & Simple Stamping Fall-To Layout 98 (FTL98) which, as you can see, is another terrific clean and simple design. The squares in the design can be either stamped or patterned paper that is cut to size. I chose patterned paper and then layered my sentiment Happy Birthday (#22803) stamp from QKR Stampede.

Even though the name of the stamp is Happy Birthday, there are four sentiments: Happy Birthday, Happy Anniversary, Happy Mother's Day, and Happy Father's Day--a terrific bargain!! Thanks for stopping by for a visit today! Have a GREAT day!!!

Sunday, July 11

Summer Time

I was at a loss as to what to call this post . . . after a while the titles seem to be redundant or bordering on ridiculous. Today's project is a clock that I created by stamping on a CD (hence, the use of "Time" in my title). A few years ago, my local stamp store held a class for stamping on CDs and turning them into clocks. I enjoyed the class, but was not extremely thrilled with the outcome of my clock (I still have it as a reminder of what NOT to do!). We used CDs--the ones that used to come unsolicited in the mail from AOL and other internet service providers--and painted the surface of the CD with acrylic paints. I was not impressed with the finish--it was flat, matte, unattractive and you could see all the brush strokes, despite efforts to get rid of them. But I liked the idea, so I continued to play with CDs at home; however, I used CDs that I bought at the store--and not just any CD, these CDs have a white surface, and are known as "printable" CDs. If you have fancy printing equipment, you can print logos or labels right onto the CD--no paper labels required.
For this CD, the background colors were created using Brilliance pigment inks and my color dusters. I then stamped the image using StazOn Jet Black ink and the Embrace Life stamp set by Stampin' Up! The leaves and flowers were colored using chalks and a blender pen. Yes, you read that right -- chalks and a blender pen. The words "embrace life" were stamped with VersaMark and embossed using gold embossing powder. Once the CD is finished, I spray with a Krylon satin finish sealant.  The clock works were purchased at my local craft store and are very easy to assemble. I do have to trim the length of the hands, but that is easily done with a pair of scissors. I have made clocks in several different themes . . . golf-themed for the golfer in your life (the word "Fore" was stamped where the numerical four would appear on the clock face); baby-themed for a baby shower; floral, autumn, lighthouses, etc. There really is no limit to your creativity with these CD clocks--and if you don't want to turn it into a clock, burn some of your favorite music to the CD, decorate the CD to coordinate with the theme of the music, and give it as a gift. I have used various coloring mediums on these CDs--the above-mentioned chalks and blender pens, pigment inks, I have even used dye inks and heat set the ink with my heat gun. I have embossed on the CDs; embossing can warp the CD a bit, but if you turn it over and heat from the other side, it flattens right out. I have applied glitter, used Stickles, etc.; however, I would strongly suggest that you do not use glitter or Stickles on any CDs that would be going into stereo equipment!! One thing I suggest doing is to cut out CD templates (I use an EK Success Circle Scissor Cutter; I have an older version which has measurements in millimeters, so the size of my circles is 118mm) and practice with stamp placement on the templates. I find it easier to see how the stamp image fits on the CD template before actually stamping onto the CD. If you have any questions, feel free to leave a comment or contact me through my email. Thanks for stopping by and visiting today! Have a great day!!

Friday, July 9

Tropical Thoughts

The "tropical" for this card boils down to the colors and the floral image. It was created using the Bodacious Bouquet and Sincere Salutations stamp sets by Stampin' Up! 
The dotted line was made using a paper piercing tool and the SU! mat pack; the dots bordering the floral image were made using the coordinating brass stencil. As you can see, the leaves were stamped, cut out, and adhered to the floral image. The center of the flower was enhanced using some glitter and a two-way glue pen. The pink card stock was cut using a pair of wavy line scissors, then layered over the blue card stock. A piece of turquoise ribbon was added for a little bit of interest. Putting together this card is pretty quick and easy. Thanks for stopping by and paying a visit today! Have a great day!!

Thursday, July 8

Silly Dolphins

This card was created using the Silly Sealife stamp set by Stampin' Up!


The waves were created by tearing two different colors of card stock (SU! Tempting Turquoise and Taken With Teal) and layering one over the other. The dolphins were stamped, colored with watercolor crayons and a blender pen, cut out and then inserted amongst the "waves" to make it look as if they were frolicking about in the ocean. This was put together quickly and, in retrospect, I should have sponged some clouds in the sky rather than having just plain white space. Thanks for stopping by and visiting! Have a GREAT day!!

Tuesday, July 6

Blog Hop Postponed

Due to unforeseen circumstances, the July Blog Hop has been postponed until Friday, July 23. Please mark your calendars and plan to be "at the Hop" then! I just returned from an out-of-state holiday weekend and will resume posting Thursday. Until I see you then, have a GREAT day!!!

Monday, July 5

QKR Monday - Happy Independence Day!

Independence Day -- a federal holiday celebrating the adoption of the Declaration of Independence. But did you know that the legal separation of the American colonies from the Kingdom of Great Britain actually occurred on July 2, 1776? The Second Continental Congress voted to approve a resolution of independence, later titled the Declaration of Independence, and debated and revised the document, with final approval on July 4, 1776. In fact, John Adams had written in a letter to his wife, Abigail: "The second day of July, 1776, will be the most memorable epoch in the history of America. . . . It ought to be solemnized with pomp and parade, . . . bells, bonfires and illuminations from one end of this continent to the other, from this time forward forever more."

In honor of Independence Day, I am posting a card that uses the Waving Flag (#16112) stamp by QKR Stampede. I have previously used this stamp for Memorial Day projects, Flag Day, and here it is, again, for Independence Day. I absolutely LOVE this flag image . . . I love its simplicity and the movement depicted in the image!

For this card, I first had the ribbon in mind, so I wanted to create a card with a vintage/Americana/folk art look to it. I decided to make my paper look like old, aged parchment paper. Here's how I did it: card stock is Stampin' Up!'s Very Vanilla. I then rubbed over the card stock lightly using my Memento Desert Sand ink pad. Then I sponged Vivid! Straw, Brown, and Taupe inks (in that order). Then I rubbed the Memento Desert Sand ink all over the piece of card stock again. Lastly, I inked the edges of the card stock using Memento Rich Cocoa. The date was printed on my computer, cut out with a Nestabilities Oval cutting die, "aged" in the same manner, layered onto a scallop oval that was cut out with a Nestabilities Scallop Oval cutting die, and adhered using foam squares.

And now for the announcement I promised. As you know, QKR has been having a blog hop each month, and this month is no different. Our July blog hop will be all about Christmas! Yes, Christmas!!! I know Christmas is five months away, but now is the perfect time to start thinking about and planning your holiday paper crafting projects . . . like the design of this year's Christmas cards! The Hop will take place this Thursday, July 8, and as always, will be started at the QKR Stampede blog. More details will follow as the week progresses. Be sure to mark your calendar for the July 8 Blog Hop. Here is a sneak peek of one of my projects:
Happy Independence Day to you and yours. As you celebrate this holiday, enjoy the local parades and fireworks displays and do be careful. Thanks for stopping by and paying a visit. Have a GREAT day!!

Sunday, July 4

Happy Independence Day!!

Today's card is all patriotic, in honor of Independence Day . . . and features the Herringbone technique from the December 2009/January 2010 issue of the Technique Junkies newsletter. This technique is easier than it may look and is a lot of fun!!

The stamp was picked up at my local craft store in one of the dollar racks (and it was only fifty cents!) and has no identifying mark with regard to the manufacturer. Be sure to stop by tomorrow for another Independence Day card and a little bit of Independence Day trivia. As you celebrate Independence Day today (this weekend) please be safe! Thanks for stopping by to visit today. Have a GREAT day!!!

Saturday, July 3

Lazy Days of Summer

This cute little frog is just kickin' back . . . enjoying the Summer days, wondering how things are by you!

The image was watercolored, and a touch of glitter added to the flower and the dragonfly. The lily pad is simply a circle from which a pie shape was cut, layered onto the card stock base, and the excess removed. Dragonflies were stamped on the card stock base to create an interesting background. Another quick and easy card!! Thanks for stopping by and paying a visit! Have a great day!!

Friday, July 2

Summer Birthday Wishes

Today I have a birthday card that is simple to make and has lots of bright and cheery Summer colors. As with my post yesterday, you can change the colors to whatever you desire.

The stamps used for this card were from the Watercolor Garden and Sincere Salutations sets by Stampin' Up! The white of the background was minimized using a scrungey-plungey . . . yep, that's what it's called. I bought this years ago at my local stamp store and still get a lot of mileage out of it. You can get the same look by using one of the plastic mesh dish scrubbers -- tap in into your ink pad, then tap onto your card stock. The difference between that and the scrungey-plungey is simply the amount of plastic mesh is less and it is adhered to a wooden handle (sort of looks like a bathroom plunger). After minimizing the white space, the card stock was wrapped with pink and green gingham ribbon. Thanks for stopping by and paying a visit! Have a GREAT day!!
Related Posts with Thumbnails